Node.js での エクセルデータ読み込み データの入っている範囲を計算する
Node.js の xlsx モジュールを使って、データの入っている範囲を計算します。 その他、特定の行のデータを取得したり、列データを取得する方法について覚え書き。
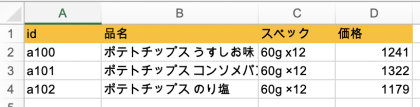
このエクセルデータのダウンロード: potate.xlsx
プロジェクトディレクトリをつくり初期化:
$ mkdir potate
$ cd potate
$ npm init --yes
必要なモジュールを入れる:
$ npm install xlsx
$ npm install underscore
index.js の作成:
$ touch index.js
まずは A1 のセルの内容を出力するコードを書きます。
const xlsx = require('xlsx')
const _ = require('underscore')

const xlsxFilename = 'potate.xlsx';

const workbook = xlsx.readFile(xlsxFilename);
const sheetNames = workbook.SheetNames;
const worksheet = workbook.Sheets[sheetNames[0]];

const rowIndex = 0;
const columnIndex = 0;

const cellAddress = xlsx.utils.encode_cell( {c:columnIndex, r:rowIndex} );
const cell = worksheet[cellAddress];

console.log(cell.w);
実行:
$ node index.js
id
id と出力されました。A1 には id という文字列が入っているのでこれでOKです。
では、1行目(rowIndex=0)はどの列までデータが入っているのでしょうか? それを調べてみます。
main.js を書き換えます。
/*
const rowIndex = 0;
const columnIndex = 0;

const cellAddress = xlsx.utils.encode_cell( {c:columnIndex, r:rowIndex} );
const cell = worksheet[cellAddress];
*/

const rowIndex = 0;

_.each( _.range(10), (columnIndex)=>{
    const cellAddress = xlsx.utils.encode_cell( {c:columnIndex, r:rowIndex} );
    const cell = worksheet[cellAddress];
    if( cell!=null ){
        console.log(`${columnIndex} : ${cell.w}`);
    } else {
        console.log(`${columnIndex} : ${cell}`);
    }
});
実行して確認:
$ node index.js
0 : id
1 : 品名
2 : スペック
3 : 価格
4 : undefined
5 : undefined
6 : undefined
7 : undefined
8 : undefined
9 : undefined
4列目 ( columnIndex=3 ) までデータが入っています。
しかし、今のコードでは 10列目まで調べていますが、10列以上あった場合に困ります。 undefined なセルになるまで繰り返し調べ、それを見つけたら、そのときの columnIndex を返す関数 lastColumnIndex , findLastColumnIndex を書きます。
const lastColumnIndex = (worksheet, rowIndex, columnIndex)=>{
    const cellAddress = xlsx.utils.encode_cell( {c:columnIndex, r:rowIndex} );
    const cell = worksheet[cellAddress];
    if( cell==null ){
        return (columnIndex-1);
    } else {
        return lastColumnIndex(worksheet, rowIndex, (columnIndex+1));
    }
};

// 指定の行における最大列数の取得.
const findLastColumnIndex = (worksheet, rowIndex)=> {
    return lastColumnIndex(worksheet, rowIndex, 0);
};
これを使うコードは:
const rowIndex = 0;
const columnIndex = findLastColumnIndex(worksheet, rowIndex);
console.log(columnIndex);
これを実行すると 3 が出力されます。 先頭行の末尾の列インデックスは 3 なので、これでOKです。
今度は、行について調べます。 1列目の最大行はどこか、さきほどと同じように lastRowIndex, findLastRowIndex という関数を書きます。
const lastRowIndex = (worksheet, rowIndex, columnIndex)=>{
    const cellAddress = xlsx.utils.encode_cell( {c:columnIndex, r:rowIndex} );
    const cell = worksheet[cellAddress];
    if( cell==null ){
        return (rowIndex-1);
    } else {
        return lastRowIndex(worksheet, (rowIndex+1), columnIndex);
    }
};

// 指定の列における最大列数の取得.
const findLastRowIndex = (worksheet, columnIndex)=>{
    return lastRowIndex(worksheet, 0, columnIndex);
};
これを使うコードは:
//
const rowIndex    = findLastRowIndex(worksheet, 0);
const columnIndex = findLastColumnIndex(worksheet, 0);
console.log(`(${rowIndex}, ${columnIndex})`);
実行すると (3, 3) が出力されます。
それでは、この関数を使って、このエクセルシートを行ごとに上から下へ向かって処理するコードを書いてみます。
行を指定して、その行の値を配列にして返す関数:
const rowCellValues = (worksheet, rowIndex)=>{
    return _.map( _.range(findLastColumnIndex(worksheet, rowIndex)+1), (columnIndex)=> {
        const cellAddress = xlsx.utils.encode_cell( {c:columnIndex, r:rowIndex} );
        const cell = worksheet[cellAddress];
        return cell.w
    });
};
この関数を使って表全体を出力:
_.each( _.range(findLastRowIndex(worksheet, 0)+1), (rowIndex)=> {
    const values = rowCellValues(rowIndex);
    console.log(values);
});
実行:
$ node index.js
[ 'id', '品名', 'スペック', '価格' ]
[ 'a100', 'ポテトチップス うすしお味', '60g x12', '1241' ]
[ 'a101', 'ポテトチップス コンソメパンチ', '60g ×12', '1322' ]
[ 'a102', 'ポテトチップス のり塩', '60g ×12', '1179' ]
できました。
まとめ
完成したコード:
const xlsx = require('xlsx')
const _ = require('underscore')

const lastColumnIndex = (worksheet, rowIndex, columnIndex)=>{
    const cellAddress = xlsx.utils.encode_cell( {c:columnIndex, r:rowIndex} );
    const cell = worksheet[cellAddress];
    if( cell==null ){
        return (columnIndex-1);
    } else {
        return lastColumnIndex(worksheet, rowIndex, (columnIndex+1));
    }
};

// 指定の行における最大列数の取得.
const findLastColumnIndex = (worksheet, rowIndex)=> {
    return lastColumnIndex(worksheet, rowIndex, 0);
};

const lastRowIndex = (worksheet, rowIndex, columnIndex)=>{
    const cellAddress = xlsx.utils.encode_cell( {c:columnIndex, r:rowIndex} );
    const cell = worksheet[cellAddress];
    if( cell==null ){
        return (rowIndex-1);
    } else {
        return lastRowIndex(worksheet, (rowIndex+1), columnIndex);
    }
};

// 指定の列における最大列数の取得.
const findLastRowIndex = (worksheet, columnIndex)=>{
    return lastRowIndex(worksheet, 0, columnIndex);
};


const rowCellValues = (worksheet, rowIndex)=>{
    return _.map( _.range(findLastColumnIndex(worksheet, rowIndex)+1), (columnIndex)=> {
        const cellAddress = xlsx.utils.encode_cell( {c:columnIndex, r:rowIndex} );
        const cell = worksheet[cellAddress];
        return cell.w
    });
};

const columnCellValues = (worksheet, columnIndex)=>{
    return _.map( _.range(findLastRowIndex(worksheet, columnIndex)+1), (rowIndex)=> {
        const cellAddress = xlsx.utils.encode_cell( {c:columnIndex, r:rowIndex} );
        const cell = worksheet[cellAddress];
        return cell.w
    });
};


const xlsxFilename = 'potate.xlsx';

const workbook = xlsx.readFile(xlsxFilename);
const sheetNames = workbook.SheetNames;
const worksheet = workbook.Sheets[sheetNames[0]];

_.each( _.range(findLastRowIndex(worksheet, 0)+1), (rowIndex)=> {
    const values = rowCellValues(worksheet, rowIndex);
    console.log(values);
});
これでセルが存在している部分だけに限定してそのセルの値を取得する方法がわかりました。
追伸 特定の列のデータをまとめて取得したい場合
たとえば、2列目の品名だけを全部取り出したい場合を考えます。
列を指定してその列にある値を配列にして返す関数:
const columnCellValues = (worksheet, columnIndex)=>{
    return _.map( _.range(findLastRowIndex(worksheet, columnIndex)+1), (rowIndex)=> {
        const cellAddress = xlsx.utils.encode_cell( {c:columnIndex, r:rowIndex} );
        const cell = worksheet[cellAddress];
        return cell.w
    });
};
これを使うコード:
const productNames = columnCellValues(worksheet, 1);
console.log(productNames);
実行結果:
[ '品名', 'ポテトチップス うすしお味', 'ポテトチップス コンソメパンチ', 'ポテトチップス のり塩' ]
Liked some of this entry? Buy me a coffee, please.